DIY loft shed for beginners step by step

Building Your Dream DIY Loft Shed: A Beginner's Guide

Hey there, fellow DIY enthusiasts! So, you're dreaming of a beautiful, functional shed â€" maybe even one with a loft for extra storage? That's awesome! Building your own shed might seem daunting, but trust me, it's totally doable, even if you're a complete beginner. This step-by-step guide will walk you through the process, making it easy and fun. Let's get started!

Phase 1: Planning and Preparation - The Foundation of Success

Before you even think about hammering a nail, you need a solid plan. This isn't about complicated architectural drawings; it's about getting organized.

Choosing Your Shed's Location

First things first: where will your masterpiece live? Consider things like sunlight (for good ventilation), access (easy to get tools and materials in and out), proximity to power (if you plan on electricity), and local regulations (check your HOA or building codes!). You'll need a relatively level area; uneven ground will make building much harder.

Designing Your Shed

Think about the size. How much stuff do you need to store? A larger shed will cost more, but a cramped one will frustrate you. Sketch out a simple plan, including dimensions for the base, walls, and loft. Remember, simple is best for a first-time builder! A basic rectangular design is easiest. Consider the height of your loft â€" you'll want enough headroom to comfortably stand up there.

Gathering Your Materials

This is where a good shopping list comes in handy. You'll need pressure-treated lumber for the base (to resist rot), framing lumber for the walls and roof, plywood for the sheathing, roofing material (shingles, metal, etc.), screws, nails, and all the usual tools â€" measuring tape, level, saw (circular saw is highly recommended), drill, hammer, etc. A detailed list is provided in the appendix (which I'll add later - consider this a promise!). Don't forget the concrete for the base!

Phase 2: Building the Foundation â€" A Solid Start

A solid foundation is crucial. A wobbly shed is a sad shed!

Preparing the Ground

Clear the area of any grass, weeds, or rocks. Level the ground as much as possible. You can use a shovel and rake for this, or rent a power tiller for larger areas. A slightly sloped ground might be fine, but a significant slope needs more careful consideration.

Pouring the Concrete Base

This is a critical step. You'll need to create a formwork (using wood planks) to contain the concrete. The dimensions should match your shed's base. Then, mix and pour the concrete, ensuring it's evenly distributed and level. Let it cure completely â€" this usually takes a few days. Don't rush this part!

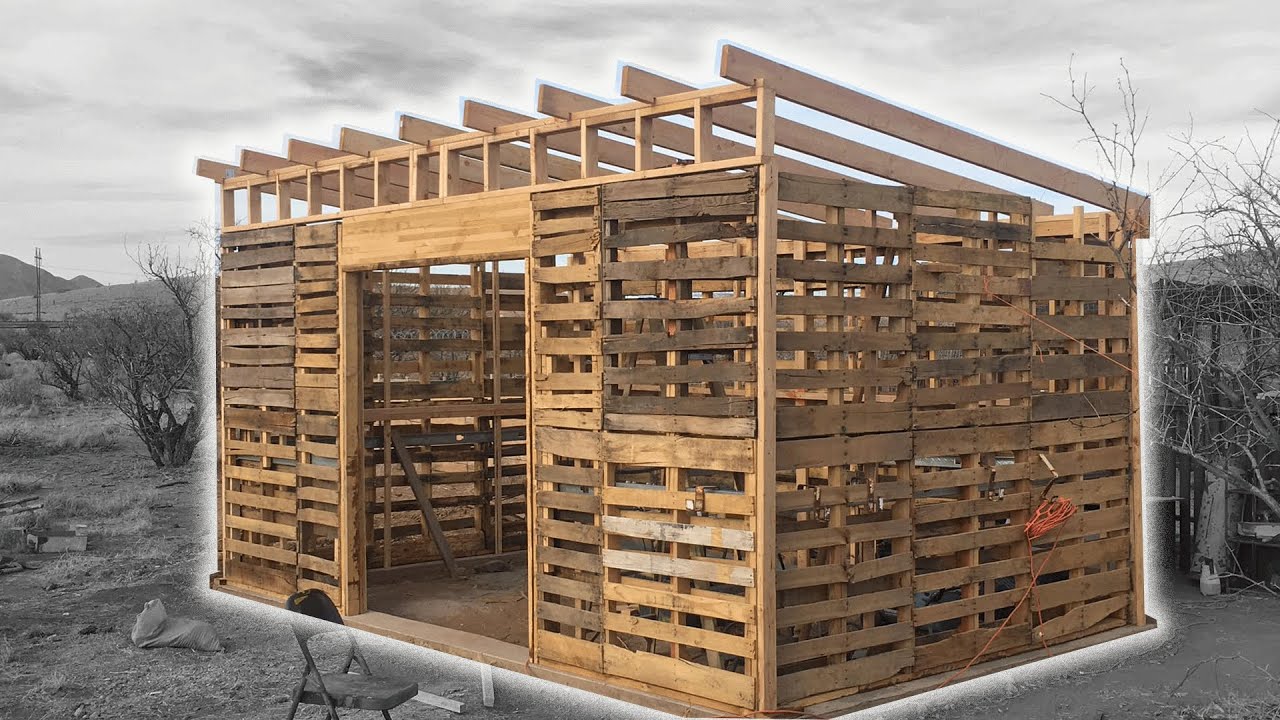
Phase 3: Framing the Walls and Roof â€" The Structure Takes Shape

Now for the fun part â€" building the actual structure!

Constructing the Wall Frames

Using your cut lumber, build rectangular frames for your shed's walls. Make sure they're square and plumb (perfectly vertical). Use a speed square and level to check your work frequently! Once the frames are built, attach them to the concrete base using anchor bolts. Remember to leave openings for doors and windows.

Building the Roof Trusses (Optional, but Recommended)

Roof trusses are pre-fabricated triangles that make building the roof incredibly easier. You can buy these ready-made or build your own if you're feeling adventurous. If you choose to build them yourself, remember the importance of accuracy and precision!

Assembling the Roof

Once the trusses are ready, lift them onto the walls and secure them. Make sure the roof is properly pitched to allow for water runoff. Then, attach the plywood sheathing to the roof trusses.

Phase 4: Siding, Roofing, and Finishing Touches â€" Adding the Beauty

Time to make your shed look amazing!

Installing the Siding

This is where you'll cover the exterior walls. You can use various materials such as vinyl, wood, or metal siding. Follow the manufacturer's instructions for installation. This is a great opportunity to add some personality to your shed!

Applying the Roofing Material

Apply your chosen roofing material (shingles, metal, etc.) according to the manufacturer's instructions. Make sure there's proper overlap to prevent leaks.

Installing Doors and Windows

Install your doors and windows, ensuring they're properly sealed to prevent drafts and leaks.

Building the Loft

This is the exciting part! Construct the loft floor using plywood or other suitable material. Support it adequately with beams and posts. Ensure it's strong enough to handle the weight of your stored items.

Phase 5: Finishing Up â€" The Home Stretch

You’re nearly there! Just a few final steps to complete your DIY loft shed.

Interior Finishing

Paint or stain the interior walls to your liking. Consider adding shelving for extra storage.

Exterior Finishing

Add any finishing touches you desire, such as painting the exterior, adding trim, or landscaping around the shed.

Safety Checks

Before you celebrate, do a thorough safety check. Make sure all connections are secure, the roof is leak-proof, and everything is structurally sound.

Commonly Asked Questions

Q: How long does it take to build a DIY loft shed?

A: This varies greatly depending on your experience and the shed's complexity. Expect it to take several weekends, possibly even longer for a first-timer.

Q: What tools do I need?

A: A circular saw, measuring tape, level, drill, hammer, screwdrivers, and safety glasses are essential. You might also need a post hole digger, depending on your foundation.

Q: How much does it cost?

A: The cost depends greatly on size and materials. You can expect a significant saving compared to a professionally built shed, but it's still an investment.

Q: Can I build a loft shed by myself?

A: It's possible, but having a helper will make the job significantly easier, especially for lifting heavier items.

Q: What if I make a mistake?

A: Don't worry! Mistakes happen. Just learn from them and adjust your approach accordingly. This is all part of the learning process.

Remember to prioritize safety throughout the entire building process. Wear appropriate safety gear, take breaks when needed, and don’t hesitate to ask for help if you get stuck. Building your own shed is a rewarding experience. Enjoy the journey!

Share:

Step-by-step shed plan for success

Building Your Dream Shed: A Step-by-Step Guide to Success

So, you're ready to build a shed? Awesome! Whether you envision a tidy storage space for garden tools or a majestic workshop for your latest project, building a shed is a rewarding experience. It's a chance to get your hands dirty, learn new skills, and create something truly useful. But before you grab that hammer, let's walk through a step-by-step plan to make sure your shed-building journey is smooth, successful, and (dare I say it) fun!

Phase 1: Planning & Preparation â€" The Foundation of a Great Shed

This isn't just about grabbing some wood and hammering away. Proper planning is crucial to avoid headaches down the line. Think of it as laying the groundwork for a masterpiece (your shed, of course!).

Choosing the Right Location:

Where will your glorious shed reside? Consider these points:

  • Accessibility: Will you need easy access for vehicles? Is it close enough to your house without being obtrusive?
  • Sunlight: Do you need ample natural light? Consider the sun's path throughout the day.
  • Ground Conditions: Is the ground level and stable? You might need to level it before you start.
  • Utilities: Will you need electricity or water? Plan for access points now.
  • Local Regulations: Check your local building codes and regulations regarding shed size, placement, and permits.

Designing Your Shed:

Now for the fun part! Sketch out your shed's dimensions and features. Consider:

  • Size: How much storage space do you need? Don't underestimate your future needs!
  • Style: Do you want a simple design or something more elaborate? Lots of inspiration online!
  • Doors and Windows: How many and what size? Think about ease of access and natural light.
  • Materials: Wood, metal, plastic? Each has pros and cons regarding cost, durability, and maintenance.
  • Roof Style: Gable, hip, shed? This affects the look and construction complexity.

Gathering Your Materials and Tools:

Create a detailed materials list based on your design. Don't forget the little things! A well-stocked toolbox will save you time and frustration. Consider renting tools if you don't own them. Here's a basic list:

  • Measuring tape
  • Level
  • Shovel
  • Post hole digger (if needed)
  • Hammer
  • Screwdriver (or drill/driver)
  • Saw (circular saw is helpful, but a handsaw works too)
  • Safety glasses and gloves (always!)

Phase 2: Construction â€" The Heart of the Project

Now comes the hands-on part! Remember, take your time, double-check your measurements, and enjoy the process.

Foundation:

A solid foundation is vital. Options include a concrete slab, gravel base, or pressure-treated wooden skids. Choose the method best suited for your soil conditions and budget. Ensure it's perfectly level!

Framing the Walls and Roof:

Follow your design plans meticulously. Precise cuts and accurate assembly are key. Don't rush this step! Use a level constantly to ensure everything is square and plumb. Consider using pre-cut lumber kits to simplify the process if you're a beginner.

Sheathing and Roofing:

Attach the sheathing (plywood or similar) to the walls and roof framing. Then install your roofing material. This is where the weather protection comes in, so make sure everything is watertight. Again, double-check your measurements and alignment.

Doors and Windows:

Install your doors and windows carefully, ensuring they fit snugly and operate smoothly. Use weatherstripping to seal any gaps.

Finishing Touches:

Once the structure is complete, add the finishing touches. This could include painting, siding, adding trim, and installing shelving or other interior features.

Phase 3: Post-Construction â€" Enjoying Your New Shed!

Congratulations! You've built a shed! But there's still a little to do.

Clean Up:

Clean up any debris and dispose of it responsibly.

Inspection:

Give your shed a thorough inspection to ensure everything is secure and functioning correctly. Make any necessary repairs.

Organization and Enjoyment:

Now comes the best part â€" organizing your new space and enjoying the fruits of your labor! Start using your shed for its intended purpose.

Commonly Asked Questions

Here are some questions people often ask about building sheds:

Q: Do I need a permit to build a shed?

A: This depends on your local building codes. Check with your local authorities before starting construction. Smaller sheds often don't require permits, but it's always best to be certain.

Q: How long does it take to build a shed?

A: The construction time varies greatly depending on the size and complexity of your shed, as well as your experience level. A simple shed can be built in a weekend, while a more elaborate one might take several weeks.

Q: How much does it cost to build a shed?

A: The cost varies depending on the size, materials, and features. You can expect to spend anywhere from a few hundred dollars for a small, simple shed to several thousand for a larger, more complex one.

Q: What if I don't have any construction experience?

A: Don't worry! There are plenty of resources available to help you, including online tutorials, books, and even shed-building courses. Start with a simpler design and take your time. Consider asking a friend or family member with experience to help you.

Q: What's the best time of year to build a shed?

A: Spring or fall are generally ideal, as the weather is usually mild and you avoid the extreme heat of summer or the cold of winter.

Building a shed is a significant undertaking, but with careful planning, attention to detail, and a little elbow grease, you'll create a valuable and satisfying addition to your property. Good luck, and happy building!

Share:

Beginner’s guide to affordable shed building

Building Your Dream Shed on a Budget: A Beginner's Guide

The allure of a new shedâ€"a haven for tools, a workshop for hobbies, or extra storageâ€"is strong. But the price tag can often be a deterrent. Fear not, aspiring shed-builders! This guide will equip you with the knowledge to construct your own affordable shed, saving you money without sacrificing quality. We’ll navigate the planning, materials, and construction phases, empowering you to create a functional and beautiful addition to your property that fits comfortably within your budget.

Phase 1: Planning Your Perfect Shed

Before you even think about hammering a nail, meticulous planning is crucial. This phase determines your project's feasibility and success. First, measure your space carefully. Determine the exact dimensions of your available land and consider any existing structures or utilities that might impact your shed’s location. Next, decide on the shed’s purpose. This dictates its size, features, and even the type of materials you’ll need. Do you need a simple storage shed, a spacious workshop, or something in between? Finally, check local building codes and obtain necessary permits. This might seem tedious, but skipping this step could lead to costly fines or even demolition down the line.

Sketching Your Vision

Once you have your measurements and purpose defined, create a rough sketch of your shed. Consider factors like door placement, window locations (if any), and roof style. This visual guide will serve as a blueprint for your materials list. Even a simple sketch is invaluable; it helps you visualize the finished product and identify potential issues before construction begins. Remember to note the dimensions of each component.

Phase 2: Sourcing Affordable Materials

Material costs can quickly inflate your budget. Smart sourcing is key to keeping expenses down. Consider reclaimed or recycled materials. Places like salvage yards, demolition sites, or online classifieds often offer excellent deals on used lumber and other building supplies. Buy in bulk when possible; purchasing larger quantities often results in lower per-unit costs. Compare prices from different suppliers before making any purchases. Don't hesitate to negotiate, especially if you're buying a significant amount of materials. This proactive approach can lead to substantial savings.

Prioritizing Materials

Focus on the essential materials first. While aesthetically pleasing features are nice, prioritize the structural integrity of your shed. Opt for pressure-treated lumber for the foundation and framing to ensure longevity and resistance to rot and insects. For siding, consider affordable options like corrugated metal or vinyl. These materials are durable, low-maintenance, and come in various colors to complement your landscape.

Phase 3: Construction â€" A Step-by-Step Guide

With your materials gathered and your plan finalized, it’s time to build! Begin by preparing the foundation. A simple gravel base is often sufficient for smaller sheds, but a concrete slab provides greater stability and durability. Next, construct the frame. Use your sketch as a guide and ensure all corners are square and level. Follow this with installing the siding, working methodically and ensuring proper overlap for weather protection. Finally, add the roof, using appropriate roofing materials based on your climate and budget. Remember to work carefully and accurately at each stage, as this ensures a strong and long-lasting structure.

Seeking Assistance

Don't be afraid to ask for help! Building a shed is a physically demanding task. Enlisting friends or family can make the process easier, faster, and more enjoyable. If you lack experience in certain aspects of construction, consider consulting with a more experienced builder for advice or assistance on complex tasks.

Building your own shed can be a rewarding experience, offering both a sense of accomplishment and significant cost savings. By carefully planning, sourcing materials wisely, and tackling the construction phase methodically, you can create a functional and beautiful addition to your property without breaking the bank. Remember, patience and attention to detail are key to success in any DIY project.

Share:

Lean-To Shed Build: Simple Materials, Maximum Results

Lean-To Shed Build: Simple Materials, Maximum Results

Lean-To Shed Build: Simple Materials, Maximum Results

Dreaming of extra storage space or a charming outdoor workspace without breaking the bank? A lean-to shed offers a fantastic solution, combining practicality with ease of construction. This guide empowers you to build your own, utilizing readily available materials and simple techniques to achieve impressive results. Forget complicated blueprints and expensive contractors; let's get building!

Planning Your Lean-To Shed

Before you even pick up a hammer, meticulous planning prevents costly mistakes down the line. First, choose your location wisely. Consider proximity to existing structures for easy access and potential utility connections. Analyze the terrain; a level base is crucial for stability. Next, determine your shed’s dimensions. Keep it simple: a rectangular shape is easiest to construct. Measure and mark the area clearly. Finally, gather your building materials. This will vary based on your design but generally includes pressure-treated lumber for the frame, plywood or corrugated metal for the walls and roof, and appropriate fasteners.

Essential Tools for Success

Having the right tools at your disposal streamlines the building process. Your arsenal should include a measuring tape, level, post-hole digger or auger (depending on your foundation), saw (circular saw is ideal), hammer, drill, screwdriver bits, and safety glasses. A shovel for grading and leveling the ground will also prove invaluable. Don’t forget to invest in quality work gloves to protect your hands!

Foundation and Framing: Building the Base

A solid foundation is paramount. For a simple lean-to, consider a concrete slab, gravel base, or even pressure-treated lumber laid on compacted earth. Level the ground meticulously before beginning construction. Once your base is secure, erect the frame. Begin by attaching pressure-treated 4x4 posts to the supporting wall of your existing structure (this will form one side of your lean-to). Then, create the opposite side with additional 4x4 posts and connect the top using 2x4 lumber to form the framework. Ensure all corners are square and securely fastened. You can use metal brackets to strengthen the connections.

Roof Construction: Keeping it Simple

Constructing the roof is straightforward for a lean-to design. Use 2x4 rafters, spaced appropriately based on the chosen roofing material's weight specifications, and connect them to the frame. Ensure a sufficient slope to allow for water runoff. You'll likely need to use a speed square to ensure the proper angle on each rafter. Once the rafters are in place, sheathe the roof with your chosen material â€" plywood, corrugated metal sheeting, or even durable tar paper, depending on your budget and aesthetic preferences. Secure the roofing material with appropriate nails or screws.

Walling and Finishing Touches

Depending on your needs, you may choose to enclose the sides of your lean-to. Plywood offers a relatively inexpensive option that you can easily paint or stain to match your existing structure. Corrugated metal sheeting offers exceptional durability and weather resistance. Install the wall sheathing, ensuring a snug fit. Consider adding a door for easy access. For a more professional finish, you can apply trim around the edges, paint, or stain the wood to match your exterior design. Always ensure that all exposed edges are properly sealed with waterproof sealant to protect against rot and water damage.

Essential Considerations

  • Building Codes and Permits: Check your local building codes and determine if a permit is required before commencing construction.
  • Weather Protection: Schedule construction during favorable weather conditions.
  • Safety First: Always prioritize safety by using appropriate safety equipment and following safe building practices.
  • With careful planning, attention to detail, and a little elbow grease, you can transform a simple concept into a practical and aesthetically pleasing lean-to shed. The sense of accomplishment is immeasurable, not to mention the added value and functionality you gain!

    Share:

    Create a Functional Wood Pallet Shed with These Simple DIY Plans

    Create a Functional Wood Pallet Shed with These Simple DIY Plans

    Build Your Dream Pallet Shed: A Totally Doable DIY Project

    Hey there, fellow DIY enthusiasts! Are you dreaming of a little extra storage space, but the thought of building a shed from scratch seems… daunting? Well, grab your coffee (or tea!), because I’m about to share the secret to building a super functional, surprisingly attractive shed using reclaimed wood pallets! This isn’t some flimsy, throw-together job; we’re talking a sturdy, weather-resistant structure that will last. And best of all? It’s easier than you think!

    Why Choose a Pallet Shed?

    Before we dive into the nitty-gritty, let's talk about why pallets are such a fantastic choice for shed building. First off, they're often free or very cheap to acquire. Check with local businesses â€" construction sites, warehouses, even grocery stores â€" many are happy to get rid of their used pallets. Second, they're already pre-cut and partially assembled, saving you a ton of time and effort on the initial prep work. And finally, they offer a rustic, charming aesthetic that many people love. Let's be honest, that reclaimed wood look is seriously on trend!

    Planning Your Pallet Shed: Size Matters!

    Before you start collecting pallets, it's crucial to plan your shed's dimensions. Consider how much storage space you actually need. Do you need to store lawn equipment, gardening tools, or perhaps just a few boxes of holiday decorations? A smaller shed is quicker and easier to build, but a larger one provides more storage capacity. Measure the area where you plan to build your shed, ensuring you have enough space for both the structure itself and easy access.

    Choosing the Right Pallets

    Not all pallets are created equal! Look for pallets that are sturdy and in relatively good condition. Avoid pallets that are severely damaged, rotted, or infested with pests. Heat-treated pallets (marked with "HT") are generally safer to use than chemically treated ones (marked with "MB"). Aim for pallets of consistent size and thickness for a more uniform build.

    Gathering Your Materials and Tools

    Once you have your pallets, you'll need a few extra materials to complete the project. This is where a good list comes in handy!

    • Pallets: The number needed will depend on your shed's size, but plan for a surplus in case some are damaged.
    • Concrete blocks or a suitable foundation: Your shed needs a stable base.
    • Pressure-treated lumber: For the frame, door, and any structural elements that need extra durability.
    • Exterior-grade plywood or sheet metal: To cover the walls and roof, providing weather protection.
    • Roofing felt or shingles: For waterproofing the roof.
    • Nails, screws, and construction adhesive: To secure all the components.
    • Hinges and a latch: For the door.
    • Measuring tape, level, saw, hammer, drill, and screwdriver: Essential tools for construction.
    • Safety glasses and work gloves: Always prioritize safety!

    Building Your Pallet Shed: A Step-by-Step Guide

    Alright, let's build! This is a simplified guide; you might need to adjust it based on your specific design and pallet sizes.

    Step 1: Foundation

    Start by creating a solid foundation. Concrete blocks are an excellent, budget-friendly option. Level them carefully to ensure the shed is stable and won't tilt.

    Step 2: Frame Construction

    Build a frame using pressure-treated lumber, creating a rectangular structure matching the dimensions of your shed. This frame will provide the support for the pallet walls.

    Step 3: Attaching the Pallets

    Carefully attach the pallets to the frame, using nails or screws. Ensure the pallets are securely fastened and aligned for a neat appearance. You might need to cut some pallets to fit.

    Step 4: Roofing

    This is a critical step! First, build a roof frame using pressure-treated lumber. Then, cover the frame with plywood or sheet metal, and finally, apply roofing felt or shingles for waterproofing and protection from the elements.

    Step 5: Door Installation

    Create a frame for your door using pressure-treated lumber. Attach hinges and a latch for secure closure. Consider adding a simple lock for extra security.

    Step 6: Finishing Touches

    Once the main structure is complete, you can add finishing touches. You could paint or stain the pallets for added protection and aesthetic appeal. Consider adding shelves or other organizational features inside.

    Tips for Success

    • Pre-treat your pallets: Consider cleaning, sanding, and applying a wood preservative to extend the life of your shed.
    • Plan your layout: Think carefully about the placement of the door and any windows or vents you might want to include.
    • Work with a friend: Building a shed is easier with an extra pair of hands!
    • Take your time: Don't rush the process. A well-built shed will last for years.

    Commonly Asked Questions

    Q: How much does it cost to build a pallet shed?

    A: The cost will vary depending on the size of your shed, the materials you use, and the condition of the pallets. However, it's generally a very budget-friendly project, often costing significantly less than a professionally built shed.

    Q: How long does it take to build a pallet shed?

    A: The construction time depends on the size and complexity of your design. A small shed can be completed in a weekend, while a larger, more elaborate project might take several weekends.

    Q: Are pallet sheds weatherproof?

    A: While pallets themselves offer some weather resistance, proper sealing and the use of weatherproof roofing materials are essential to make your shed truly weatherproof.

    Q: What permits do I need?

    A: Building regulations vary by location. Check with your local authorities to see if you need a permit before you begin construction.

    Q: Can I customize my pallet shed?

    A: Absolutely! Pallet sheds are highly customizable. You can adjust the size, add windows, paint or stain the wood, and incorporate various features to match your specific needs and style. Let your creativity flow!

    There you have it! With a little planning and effort, you can easily build a functional and attractive pallet shed. Remember to prioritize safety and enjoy the process. Happy building!

    Share:

    Wooden Pallet Shed Plans for Practical Outdoor Storage Solutions

    Wooden Pallet Shed Plans for Practical Outdoor Storage Solutions

    Wooden Pallet Shed Plans for Practical Outdoor Storage Solutions

    Hey there, fellow DIY enthusiasts! Let's talk about building something awesome: a shed made entirely from reclaimed wooden pallets. I know what you're thinking â€" pallets? Really? But trust me, with a little creativity and elbow grease, you can transform those humble shipping platforms into a surprisingly sturdy and stylish outdoor storage solution. This isn't some flimsy, fall-apart structure; we're talking about a practical, functional shed that will last for years. And the best part? It's incredibly budget-friendly!

    Why Choose a Pallet Shed?

    Before we dive into the plans, let's talk about the awesome benefits of choosing a pallet shed. First off, the cost savings are significant. Pallets are often free or very cheap to acquire â€" you can often find them behind businesses, construction sites, or even on Craigslist. This makes it a fantastically affordable option compared to buying pre-fabricated sheds or using new lumber.

    Secondly, it's incredibly eco-friendly. Repurposing pallets keeps them out of landfills, reducing waste and contributing to a more sustainable lifestyle. It's a great way to give these materials a new purpose and extend their lifespan. You're basically upcycling on a grand scale!

    Finally, and this is something I really appreciate, a pallet shed offers a unique, rustic aesthetic. It adds a charming character to your backyard that's difficult to replicate with other materials. It's a statement piece that shows off your DIY skills and your commitment to sustainability.

    Planning Your Pallet Shed Project

    Before you grab your hammer and nails (or maybe your power tools!), let's do some planning. This will save you headaches later on. We'll break it down into manageable steps:

    Choosing Your Pallets

    Not all pallets are created equal. You'll want to source pallets made of strong, durable wood, preferably heat-treated (HT) or ISPM-15 stamped. Avoid pallets that are rotted, heavily splintered, or show signs of significant insect damage. The more sturdy the pallets, the stronger your shed will be. Aim for pallets with similar dimensions for easier construction.

    Determining the Size and Design

    Think about what you plan to store in your shed. This will directly impact the size you need. A small shed might be perfect for storing gardening tools, while a larger one might be needed for lawnmowers and other equipment. Consider the available space in your yard as well. Sketch out a basic design; it doesn't have to be perfect, just something to guide you.

    Gathering Your Tools and Materials

    Beyond the pallets themselves, you'll need a few essential tools and materials. This list is not exhaustive, but it covers the basics:

    • Hammer or nail gun
    • Screws or nails (galvanized are best for outdoor use)
    • Measuring tape and level
    • Saw (circular saw or hand saw)
    • Safety glasses and gloves
    • Shovel (for preparing the ground)
    • Optional: Power drill, post hole digger
    • Optional: Plywood or other sheeting for walls (for a more enclosed feel)

    Building Your Pallet Shed: A Step-by-Step Guide

    Alright, let’s build! Remember, this is a general guideline. Your specific steps might vary depending on your chosen design and the size of your pallets.

    Preparing the Foundation

    Start by leveling the ground where you want to build your shed. A simple gravel base or a concrete slab is ideal. This will provide a stable foundation to prevent settling and protect the wood from moisture.

    Constructing the Frame

    Carefully dismantle some of your pallets to create the main frame of your shed. You can use the longer pieces for the base, creating a rectangular structure. Make sure your corners are square and secure. You might need to cut some pieces to fit.

    Adding the Walls and Roof

    This is where you’ll get creative! You can use intact pallets to create the walls, securing them to the frame. For the roof, you can use more pallets, angling them to create a simple shed roof. You could also add plywood or other sheeting for a more finished look and better weather protection.

    Adding Finishing Touches

    Once the structure is complete, you can add finishing touches like a door (using more pallet wood or purchasing one), hinges, and a latch. Consider adding a coat of weather sealant or paint to protect the wood from the elements and enhance the aesthetic.

    Tips for Success

    Here are a few tips to ensure a successful pallet shed project:

    • Safety First! Always wear safety glasses and gloves when working with wood and tools.
    • Inspect Your Pallets Thoroughly Before using them to ensure they're sturdy and free of hazards.
    • Pre-Drill Holes Before screwing in nails or screws to prevent the wood from splitting.
    • Work with a Friend For easier lifting and maneuvering of the pallets.
    • Be Creative! Don't be afraid to experiment with the design and add your personal touch.

    Commonly Asked Questions

    Here are some questions I often get about building pallet sheds:

    Q: How long does it take to build a pallet shed?

    A: It depends on the size and complexity of your shed, and your experience level. A small, simple shed might take a weekend, while a larger, more elaborate one could take several weekends.

    Q: How much does it cost to build a pallet shed?

    A: The main cost is your time and the cost of any additional materials like screws, hinges, and sealant. If you source your pallets for free, the overall cost can be very low.

    Q: How durable is a pallet shed?

    A: With proper construction and maintenance (a coat of weather sealant is highly recommended), a pallet shed can be surprisingly durable and last for several years.

    Q: Can I add insulation to my pallet shed?

    A: Yes, you can add insulation to your shed for increased warmth and protection against the elements. There are various insulation options available, including foam board or spray foam insulation.

    Q: What kind of permits do I need to build a pallet shed?

    A: This varies by location. Check with your local authorities to determine if you need any permits before starting your project. In many cases, small sheds may not require permits, but it’s always best to be sure.

    So there you have it! Building a pallet shed is a rewarding project that combines practicality, sustainability, and a touch of rustic charm. Get out there, gather your pallets, and let's get building!

    Share:

    How to Build a Sturdy and Functional Wood Pallet Shed on a Budget

    How to Build a Sturdy and Functional Wood Pallet Shed on a Budget

    Building Your Dream Pallet Shed: A Budget-Friendly Guide

    Hey there, fellow DIY enthusiasts! So you're dreaming of a sturdy, functional shed, but the price tags at the hardware store are giving you sticker shock? Don't worry, you're not alone! Let's build a fantastic shed using reclaimed wood pallets â€" it's cheaper, eco-friendly, and a seriously satisfying project. This guide will walk you through the entire process, from planning to finishing touches. Grab your tools, let’s get started!

    Phase 1: Planning and Preparation â€" The Foundation of a Great Shed

    Before even touching a pallet, proper planning is key. This is where you avoid costly mistakes and ensure your shed is exactly what you want.

    Choosing Your Palettes

    This is the fun part (and maybe the slightly tedious part)! You'll need to source your pallets. Check with local businesses â€" grocery stores, construction sites, and even breweries often have pallets they're happy to give away or sell cheaply. Important Note: Make sure the pallets are heat-treated (marked with HT or ISPM 15) and free from rot, excessive damage, or any nasty critters.

    Site Selection and Dimensions

    Where will your masterpiece go? Consider factors like sunlight, access, and proximity to your house. Next, decide on the size. Keep it manageable â€" a smaller shed is easier to build and often requires less material. Sketch out a simple plan including the dimensions of your walls, roof, and door.

    Gathering Your Tools and Materials

    Beyond the pallets, you'll need some basic tools and materials. This is not an exhaustive list, but a good starting point:
    • Hammer
    • Screwdriver (or drill with screwdriver bits)
    • Measuring tape
    • Level
    • Saw (circular saw or hand saw)
    • Safety glasses
    • Work gloves
    • Shovel (if you're building a base)
    • Concrete mix (optional, for a more permanent base)
    • Nails or screws (longer screws are better for durability)
    • Wood glue (optional, but highly recommended for extra strength)
    • Exterior-grade paint or sealant (to protect your shed from the elements)
    • Roofing felt or other weatherproof roofing material

    Phase 2: Building the Base â€" A Solid Foundation

    Your shed's stability begins with its base. Here are a few options:

    Simple Pallet Base

    The easiest option is to directly lay the pallets on the ground. This is best for temporary sheds or areas with well-drained soil. Make sure the ground is level as much as possible to prevent uneven settling. You might want to place weed barrier fabric underneath to prevent weeds from growing through.

    Gravel Base

    For better drainage and slightly elevated protection, consider a gravel base. Dig a shallow pit, lay down landscape fabric (to prevent weed growth), and fill it with gravel. Level the gravel carefully before placing your pallet structure.

    Concrete Base (Most Durable)

    For the most permanent and durable solution, pour a concrete slab. This requires more work and material but offers superior longevity and stability. Follow the instructions on your concrete mix carefully. Ensure the slab is level.

    Phase 3: Constructing the Walls and Roof â€" Bringing Your Shed to Life

    Now for the exciting part â€" building the actual shed!

    Wall Construction

    Start by laying out your pallets to create the walls. You’ll likely need to disassemble some pallets and use the individual boards to fill gaps or create specific sizes, ensuring the walls are strong and stable. Use screws for added strength rather than just nails. Consider adding cross-bracing for extra stability, especially in taller structures. Remember to leave space for your door.

    Roof Construction

    The roof design depends on your preferences and the overall size of your shed. A simple gable roof (a triangular roof) is easy to build. You can use more pallets, or you can opt for inexpensive plywood or other roofing materials for a more traditional look. Ensure the roof is sloped enough to allow for proper water runoff. Use strong supports and secure the roofing materials to prevent leakage. Add a layer of roofing felt for additional weather protection before adding your final roofing material.

    Door Installation

    Cut out a space for your door. You can use more reclaimed wood pallets to build a simple door frame and then use old door or even pallet wood to construct the door itself. Consider adding hinges and a latch for security.

    Phase 4: Finishing Touches â€" The Finishing Line

    Almost there! Now it’s time to add the finishing touches that will make your pallet shed not just functional, but also aesthetically pleasing.

    Painting and Sealing

    Use exterior-grade paint or wood sealant to protect your shed from the elements. Choose a color that complements your surroundings. This will also significantly extend the life of your shed.

    Adding Shelves and Organization

    Now it's time to personalize your shed! Install shelves using leftover pallet wood or inexpensive lumber to optimize your storage space. Think about how you'll use the space and plan accordingly.

    Finishing Touches

    Consider adding things like a small window for ventilation and light, or landscaping around the base of your shed to make it look even better.

    Commonly Asked Questions

    How long does it take to build a pallet shed?

    The time required varies greatly depending on the size and complexity of your shed, your DIY experience, and the availability of materials. A simple shed can be built in a weekend, while a more complex structure might take several weekends.

    How much does it cost to build a pallet shed?

    The cost is significantly lower than a traditional shed, primarily depending on the cost of additional materials like screws, sealant, and any roofing materials not salvaged from pallets. Your investment will mostly be your time and effort.

    Are pallet sheds durable?

    With proper construction and the use of quality materials and fasteners (like longer screws), a pallet shed can be surprisingly durable. Regular maintenance, such as repainting or resealing, will extend its lifespan significantly.

    Are there any permits required?

    Building codes and permit requirements vary by location. Check with your local authorities before starting your project to ensure compliance. Small, simple sheds might not require a permit, but larger structures usually do.

    Can I use any type of pallet?

    No, only use heat-treated pallets marked with HT or ISPM 15. These are safe for use and comply with international standards for pest control.

    There you have it! Building a pallet shed is a rewarding project that can save you money and allow you to create exactly the storage space you need. Remember to prioritize safety, plan carefully, and enjoy the process! Happy building!
    Share: